 XXAMC3 Android 4.1.2 is the latest firmware update available for the Galaxy Camera EK-GC110 – WiFi model of the Android based camera. This new Jelly Bean firmware update brings the new Android 4.1.2 update with bug fixes and maintenance build. You can download this firmware from Samsung KIES, or if you can’t find the update here, we have a complete tutorial below for you. You can easily update Galaxy Camera GC110 to XXAMC3 Android 4.1.2 Jelly Bean official firmware using our tutorial. ClockworkMod recovery or a rooted Galaxy Camera is not required.
As you continue reading this post, we will guide you through all the steps of how to install XXAMC3 Android 4.1.2 Jelly Bean firmware on Galaxy Camera GC110. Don’t forget to backup all your apps and other personal data from the tips below. This is a branded firmware, which means your Galaxy Camera GC110 can get some extra language packs and some carrier apps. Make sure you backup your important data as a precaution. The following tips are important as they will help the installation procedure to go smooth without any issues. Let’s continue with the tutorial now.
Disclaimer: All the custom ROMs and firmwares, official software updates, tools, mods or anything mentioned in the tutorial belong to their respective owners/developers. We (MTS) or the developers are not to be held responsible if you damage or brick your device. We don’t have you on gun point to try out this tutorial
Galaxy Camera XXAMC3 Android 4.1.2 Firmware Details:
PDA: GC110XXAMC3
CSC: GC110LUXAMC2
Version: 4.1.2
Date: 2013 March
Regions: Austria, Belgium, France, Germany, Hungary, Italy, Spain, United Kingdom
If you plan on rooting this camera or are still confused on why to root Galaxy Camera GC110, you may google it up for detail.
It is always recommended to update your Samsung devices from Samsung KIES as it downloads the latest and the most up-to-date firmware for your Android phone, tablet or camera. But for those who want to install it manually, keep reading below.
Samsung Galaxy Camera USB Drivers
You will need to connect your Android phone with the computer. For that, please make sure you have installed the USB drivers for Samsung Galaxy Camera properly. If not, you can download the latest official drivers from our Android USB Drivers section here:
Backup and Other Important Tips
Done with the USB drivers? Perfect. The tutorial is on the next page, but first, please take a look at the following tips and important points you need to take care of. These are important, as we don’t want anyone losing their personal data or apps:Always backup your important data that you might need after you install a new custom ROM, an official software update or anything else. Make a backup for just in case, you never know when anything might go wrong. See below for some tips on how to backup data:

- Backup your Apps. How? –> How to Backup Android Apps.
- Backup your SMS messages. How? –> How to Backup/Restore SMS Messages.
- Backup Call History. How? –> How to Backup Call History.
- Backup APN Settings: GPRS, 3G, MMS Settings. How? Note down everything from: Settings > Wireless & Networks (More…) > Mobile networks > Access Point Names.
If you already have a custom recovery (ClockworkMod, TWRP etc.) installed on your phone, we strongly recommend a backup using that as it creates a complete image of your existing phone set up.
A few more optional tips that you should remember:
1. Having problems connecting your Android phone to the computer? You need to enable USB debugging mode.2. Make sure your Android device is charged up to 80-85% battery level. Why? Because, if your phone goes off suddenly while installing a custom ROM, flashing an official firmware update or installing mods etc. — your phone might get bricked or go dead permanently. No one wants that, right?
3. Most of the tutorials and how-to guides on MyTrickSource are for factory unlocked Android phones and tablets. We recommend NOT to try our guides if your phone is locked to a carrier, unless we have specified the carrier name or device model.
If you find the above tips useful and they were helpful to you, please consider giving us a +1 or LIKE to thank us!
All set and ready? Good. You can now head over to the next page and update Galaxy Camera GC110 to XXAMC3 Android 4.1.2 official firmware update.
How to Install XXAMC3 Android 4.1.2 on Galaxy Camera GC110
We have put together a detailed step-by-step instructions guide on how to update Samsung Galaxy Camera to XXAMC3 Android 4.1.2 Jelly Bean. If you are used to installing official updates through ODIN on Samsung Galaxy devices, then this should not be any different for you.
Please read every line carefully and make sure you read the tutorial once before actually performing on your device.
Please read every line carefully and make sure you read the tutorial once before actually performing on your device.
To Remember:
This tutorial is only for Samsung Galaxy Camera GC110. Please don’t try this on any other variants of the device.
GC110XXAMC3 is an official firmware for the Galaxy Camera GC110. Not a modified or a custom ROM.
Make sure you backup all your data before proceeding.
Rooting Warning: This is an official Android 4.1.2 build XXAMC3 update for Galaxy Camera GC110, which means you will lose root as soon as you install this update. You will again have to root Galaxy Camera to gain full system access and be able to install root apps again. We will soon do a tutorial on how to root Galaxy Camera GC110 on the latest Android 4.1 Jelly Bean firmware.
Complete Step-By-Step Instructions:
Step 1 - Download Android 4.1.2 GC110XXAMC3 for Galaxy Camera to your computer and extract the zip file.
Step 2 - Download ODIN which will help you to install Android 4.1.2 on Samsung Galaxy Camera.
Step 3 - Switch OFF your camera. Now go to Download Mode. How? Press and hold the Volume Down + Home buttons together, and then press the Power button, till you see the Samsung logo or the construction Android robot and a triangle. This is the Download Mode.
Step 4 - Make sure you have your Galaxy Note USB drivers installed on your computer.
Step 5 - Open ODIN on your computer. Connect your phone to your computer while your phone is in the Download Mode.
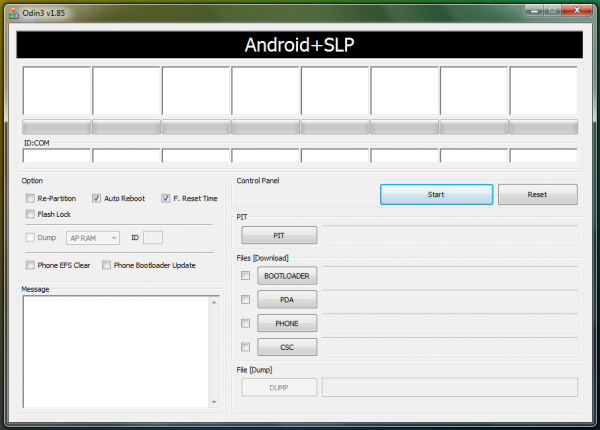
Step 6 - If your phone is connected successfully, one of the ID:COM boxes will turn yellow with the COM port number. This step might take some time.
Step 7 - Now select the files that you have to flash/install on your phone. These files are to be found from the extracted files in Step 1.
- Click on ‘PDA’ and select file with ‘CODE’ in its name.
- Click on ‘Phone’ and select file with ‘MODEM’ in its name. Ignore this step if there is no such file.
- Click on ‘CSC’ and select file with CSC’ in its name. Ignore this step if there is no such file.
- Click on ‘PIT’ and select the .pit file. Ignore this step if there is no such file.
Step 8 - In ODIN, check the Auto Reboot and F. Reset Time options. As for the Re-Partition option, check it ONLY if you selected a .PIT file in the above step.
Step 9 - Now click on the Start button in ODIN. Installation process will start and would take a few minutes to complete.
Step 10 - After the installation is completed, your phone will restart. After you see the home screen, unplug your phone from the computer.
That’s it. Your Samsung Galaxy Camera has now been updated to XXAMC3 Android 4.1.2 software update. Go to Settings > About phone to verify.
Hit +1 or LIKE to thank us!
If you run into any problems, feel free to drop us a comment below and we will reply you back ASAP with the fix or the solution to your problem.`


0 comments:
Post a Comment